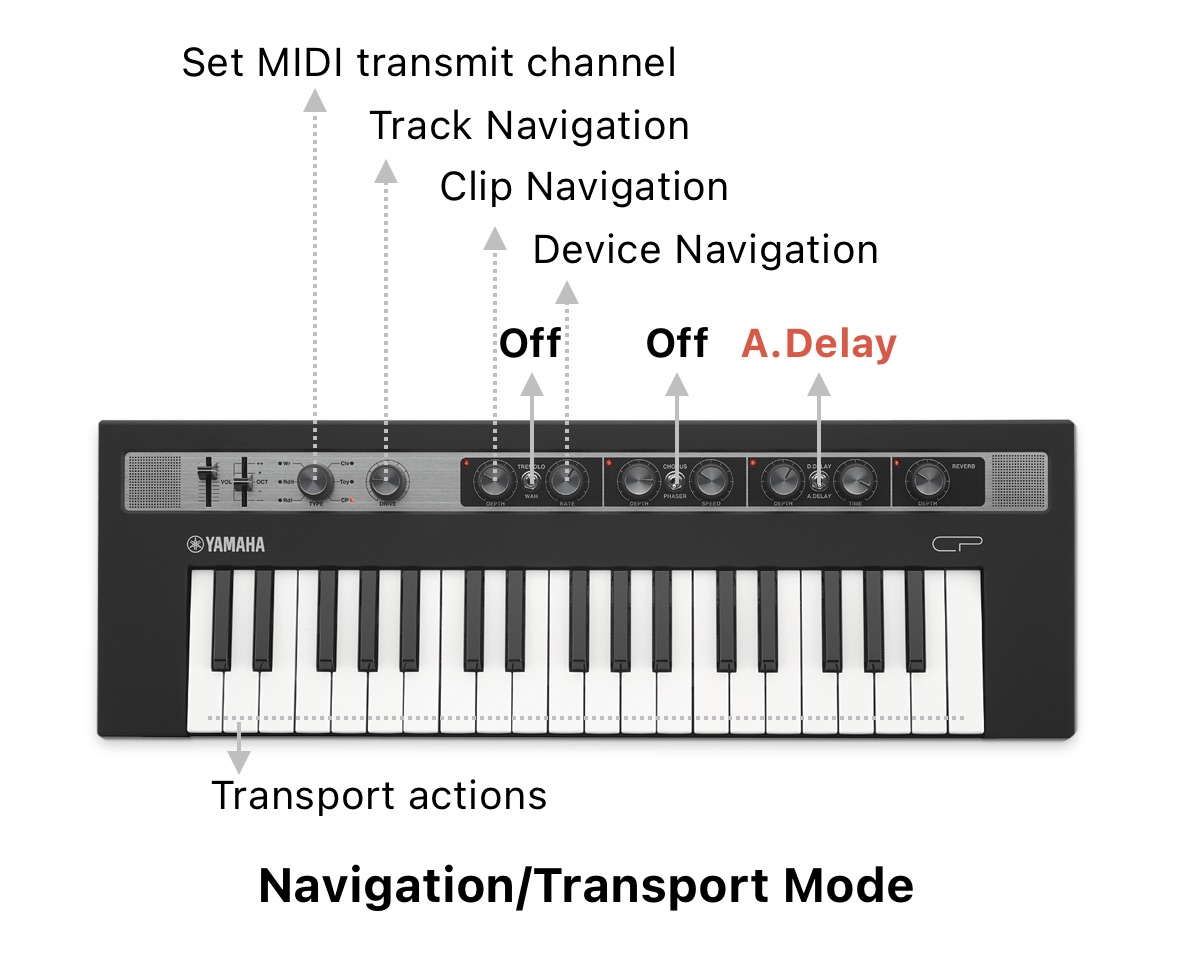
Navigation/Transport Mode
In this mode, the knobs are used for navigation and the note keys for transport actions and more.
Turn on the A.Delay switch (down position) to enable the Navigation/Transport Mode.
Note: This mode overrides any other active mode. This means that while this mode is enabled the other toggle controls (tremolo/chorus) used to enable the other modes have no effect.
Controls
The following controls apply in this mode:
| Control | Description |
|---|---|
| Wave Type | Set MIDI Transmit channel. |
| Drive | Track navigation. Move the knob to change the track selection including sends and the master track. |
| Tremolo Depth | Clip navigation. Move the knob to change the clip selection in the current track. |
| Tremolo Rate | Device navigation. Move the knob to change the device selection in the current track. |
Note: Since the knobs in the Reface CP are not endless and send fixed MIDI CC values, the track/clip/device navigation will only allow selecting up to 127 elements. For instance, if you have more than 127 tracks in your Live Set then some of the intermediate tracks won’t be accessible using this knob. But usually this doesn’t happen unless you’re Jacob Collier… ;) In any case, the track can still be selected manually or using some of the actions from the list below and the knobs can be used to get closer to them faster.
Note-key Actions
In this mode, each note key has a special function and can be recalled from any octave in the keyboard for easiness of use. In most cases, a secondary note can also be pressed to perform subactions.
When pressing down the first key, a hint message is displayed in Live’s bottom status bar. If the first note key is pressed and held for more than 3 seconds without pressing any other key the ongoing action is automatically cancelled to prevent triggering unwanted actions. This timeout corresponds approximately to the duration that Live displays messages from the script in the status bar.
Here are all the actions that can be triggered from the MIDI keyboard:
*Note: Unless specified, all secondary action notes from the list correspond to the note within the same octave as the main action note. Higher or lower octaves are represented with a +n or -n text next to it.
C ⏐ Stop actions
- Press and release the key to stop playing.
- Press and hold + C# to stop playing clips from all armed tracks.
- Press and hold + E to stop all clips from all tracks.
- Press and hold + F to stop the current track clip (if any).
- Press and hold + F# to stop all recording clips.
C# ⏐ Recording actions
- Press and release the key to toggle the Arrangement record.
- Press and hold + C to go back to Arrangement.
- Press and hold + D# to toggle the Session record.
- Press and hold + D to toggle MIDI Arrangement overdub.
- Press and hold + E to toggle automation arm.
- Press and hold + F to re-enable automation for any parameters that are currently overriden in the Arrangement or Session clips.
D ⏐ Play actions
- Press and release the key to start playing.
- Press and hold + use the white keys to change the song position (jump) according to the distance between the first key (D) and the second. This means the position can jump forwards by pressing a second higher white note or backwards by pressing a second lower white note.
- Press and hold + C# to jump to the previous cue marker.
- Press and hold + D# to jump to the next cue marker.
- Press and hold + F# to play all recording clips.
- Press and hold + G# to continue playback from the current position.
- Press and hold + A# to play the selected scene.
E ⏐ Tempo actions
- Press and release the key to toggle the Metronome.
- Press and hold + F to decrease the clip trigger quantization.
- Press and hold + F# to reset the clip trigger quantization to 1 bar.
- Press and hold + G to increase the clip trigger quantization.
- Press and hold + A to Tap Tempo.
F ⏐ Track actions
- Press and release the key to toggle the Clip/Device view.
- Press and hold + C to mute the selected track.
- Press and hold + C# to arm the selected track.
- Press and hold + D to solo the selected track.
- Press and hold + E to select to the previous track.
- Press and hold + G to select to the next track.
- Press and hold + A to select the current track’s instrument.
F# ⏐ Quick-recording actions
- Press and release the key to start a quick clip recording on all selected tracks. This starts recording on the next free scene of all selected tracks, creating a new scene if necessary. If a track is not armed it will be armed automatically if possible.
- Press and hold + C to stop all recording clips.
- Press and hold + C# to start a quick recording on all armed tracks. This starts recording clips on the next free scene of all armed tracks, creating a new scene if necessary.
- Press and hold + D to play all recording clips.
- Press and hold + F to start an Audio track resampling. This starts recording a new Audio clip into a track that takes the audio signal from the selected track’s output, creating a new track if none is found.
- Press and hold + G to start a MIDI track resampling. This starts recording a new MIDI clip into a track that takes the MIDI signal from the selected track’s output, creating a new track if none is found.
- Press and hold + G# to start a quick resampling. This starts recording a new clip in the next free scene of a track with a resampling input. If no resampling track is found a new one is created.
G ⏐ Clip actions
- Press and release the key to show the Clip view.
- Press and hold + C to stop the selected clip.
- Press and hold + C# to delete the selected clip.
- Press and hold + D to fire the selected clip.
- Press and hold + E to fire the selected scene.
- Press and hold + F to select the previous clip slot.
- Press and hold + A to select the next clip slot.
A ⏐ Device actions
- Press and release to select the currently assigned (or locked) device.
- Press and hold + C to toggle the device on/off.
- Press and hold + G to select the previous device.
- Press and hold + B to select the next device.
A# ⏐ Edit actions
- Press and hold + A to undo last action.
- Press and hold + B to redo last action.
B ⏐ Loop actions
- Press and release the key to toggle loop.
- Press and hold + D# to jump song position to the loop start position.
- Press and hold + F# to decrease the loop length.
- Press and hold + G# to increase the loop length.
- Press and hold + A# to set the loop between the nearest cue points.
- Press and hold + use the white keys to change the loop start position according to the distance between the first key (B) and the second. This means the position can jump forwards by pressing a second higher white note or backwards by pressing a second lower white note.